Hello there! It's Michelle Griffo from Apples and ABC's guest blogging here!
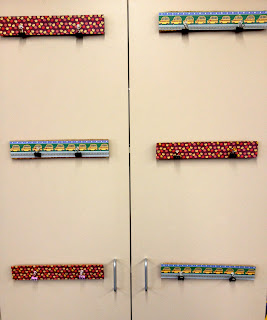
I am so excited to be sharing a fun idea with you on Kindergarten Lifestyle! I want to show you a creative way to display student work without having to use a bulletin board! I only have 3 bulletin boards in my classroom, so I made mini cork boards to clip student's work onto. I stuck these onto my cupboards with 3M Tape, and then I can constantly be showing off writing, without using my precious wall space!
Here is the finished product of what the mini cork boards look like on my cupboards. I used push pins and small binder clips to hold up their writing onto the cork board!
Here is how I made these little gems... they lasted all year long, and I know I will be able to use them next year too. I'll show you step by step, so you can make them too!
I started by finding cute scrap booking paper that would be great to use in the classroom! I chose to a school bus and apple print so I could keep the paper up year-round.
After the cute scrap book paper was picked out, there were a couple of other items that I needed: scissors, ruler, and most importantly, cork board. I bought this square at Target (you can get it at any place that has an office supply area, and they come in a 4 pack).
First, I used the ruler to mark out how thick I wanted my mini cork board to be. I made them about 3 inches thick so you could still see the cute scrap book paper when the student's writing was hanging up!
Once I made my line, then I cut the piece off. It actually works better if you use a razor of sorts, instead of scissors, it makes a cleaner cut!
The next step was to cut a 3 inch strip of scrap book paper and glue it to the top of the cork board. I used a hot glue gun to make sure that puppy stayed for good!
Now, I added two extra squares to the back of the cork board strip because I found that the push pins I used were much longer than the thickness of the cork. So I cut out two squares and added them to the back where the push pins would go...
The final step was I added two push pins and hung a small binder clip on each. This way the paper could be squeezed by the clips and hang up nicely! :) Once I made them, I hung them on the cupboards with 3M Tape and we were ready to go! One thing I liked about these, is that I kept layering each writing assignment on top of the other. That way, parents could flip through and see samples of their student's writing from the whole year. It was like having a portfolio on display year round. This would also be helpful to show the stages of writing, using thinking maps, rough draft, all the way to the final draft!
I hope you enjoyed this post, and I am so happy that Jeannie had me as a guest blogger! Please come by and visit me at Apples and ABC's! :)
-Michelle Griffo


No comments:
Post a Comment